Before Tie and I embark on any adventure, I usually do some thorough planning to ensure we make maximum use of our time there. Of course, sometimes we might come across a snafu or are simply too tired to wake up super early, but it’s still better to be prepared 🙂 Two of my favorite tools for trip planning are Google Sheets and Google Maps, and they’re both free!
The first step is creating a new Google Sheet. Just log in to your Google account, go to drive.google.com and click on New > Google Sheets. I title each sheet based on the trip and date (ex. Barcelona 2013). Then I share it with whoever is traveling with me (mostly Tie) by clicking Share and adding his email.
Here’s how a typical spreadsheet looks (click to enlarge):
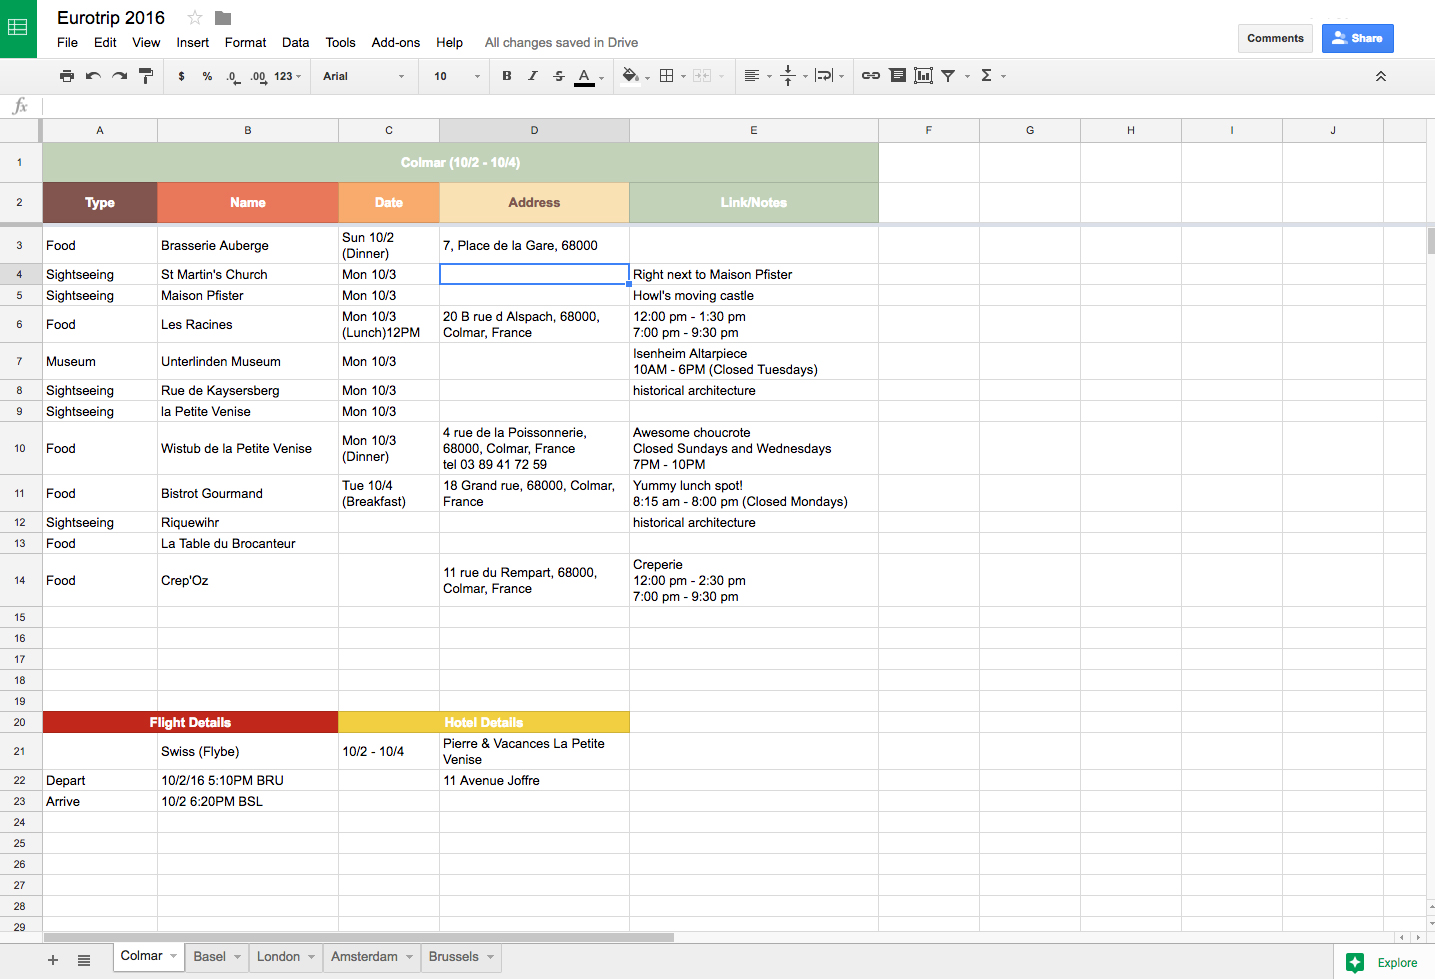
For our Eurotrip, we visited several countries which I separated into tabs at the bottom (in order of when we arrive at each destination). To add a new tab, just click the + icon. At the top, I include the name of the city/country with the date range we will be there so I know how much time we’re working with. Below that, I divide the spreadsheet into five categories: Type, Name, Date, Address, Link/Notes. Since the spreadsheet might scroll, I want to freeze this row so it doesn’t move with the rest of the sheet. Select the row and go to View > Freeze > Up To Current Row.
Now comes the fun part. I populate the spreadsheet with all the places I want to visit (after extensive research!). The only column I leave empty in the beginning are the dates. I add it after I use Google Maps (more on that later). In the link/notes section I normally add essential information like ticket prices, opening/closing times, and general directions. It’s also a good idea to add a small note about the place to jog your memory. Maison Pfister means nothing to me since I haven’t visited it yet, but by adding “Howl’s moving castle” in the notes section, I now remember that this is the building on which the castle is based. It helps when it comes to prioritizing which activities you want to do.
Below the schedule, Tie adds the flight + hotel details. Wouldn’t want to arrive late at the airport or miss a check-in date! It also lets me know if we can squeeze in one last activity before our flight or if we can leave our luggage at the hotel if we get there early.
Okay, now let’s jump to Google Maps for a bit. Go back to Google Drive and click on New > More > Google My Maps. You’ll notice that this is different from the Google Maps one usually uses to find directions. Think of it as the digital equivalent of the map you pin on your wall to mark where you’ve been.
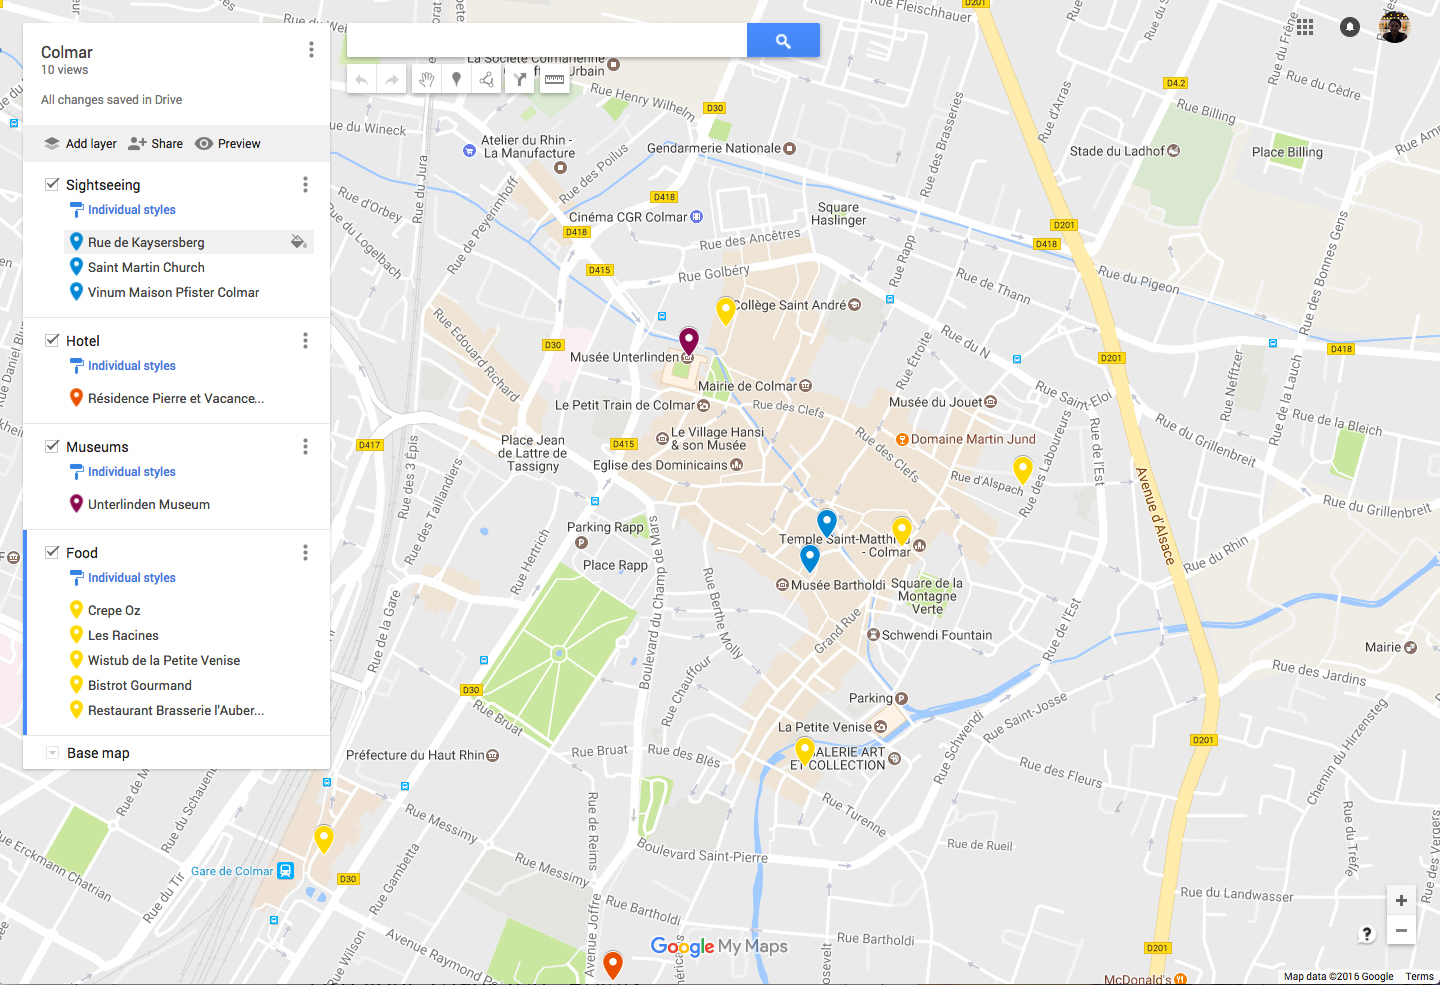
To start, similar to Google Sheets, I title the map based on where I am headed and share it with my travel companion(s). It’s all concentrated on the left-hand side. Unlike Google Sheets, however, I do not create tabs here for several countries. I prefer to stick to one city/country at a time so the map doesn’t have to keep toggling between places. It gets dizzying. Instead, I add layers based on what’s in the “Type” column of my spreadsheet. So, things like “food,” “sightseeing,” or “museums.” I also always add a layer for the hotel we’re staying at so I can see where things are relative to the location of our base camp.
To add a new point of interest, just type in the name of the place or its address into the search bar up top. A pin will appear and you can click on it to add it to its respective layer (make sure the layer is selected – indicated by a blue bar next to it). I like to designate a color for each layer as well so it’s extra organized. Hover over one of the points of interest on your list and you’ll see a paint can next to it. Click on it to change the color.
Now what was the point of this exercise besides seeing where everything is? Well, now that I know their proximity to each other, I can start clustering them together. So if there are several restaurants or activities close to a museum, I would try to schedule those in the same day. It doesn’t always work out that way if, for example, there are five museums on the same block and you only have time to check out 3 a day. But it’s a good starting point for planning your itinerary.
With my handy map, I can go back to the Google Sheet and start adding dates for each activity based on their relative location. Remember to add in your meals and reservation times! That’s often one of the best parts of an itinerary 😉 I almost always have items that simply does not fit into our itinerary (you can only see so much given a limited time frame!), but I place them at the bottom of the list and just leave out the dates. In case we revisit this location in the future, I’ll know which places I’ve considered visiting but didn’t make the cut the first time around.
You can download the Google Sheets and Google Map apps on your phone to access this information while on the go. I remember traveling years ago with nothing but printed maps and guidebooks. Technology is an amazing thing, and I encourage you all to take advantage of these handy, accessible, and easy-to-use tools!